Friday, 1 March 2013

Littlest baker turned 5!

What a week last week was! Littlest baker turned a whole 5 years old on Thursday 21st and it feels like I spent most of last week (at least) preparing to celebrate and actually celebrating!

It all began with the cake, I've not actually done much cake decorating and certainly never tried to do anything on the scale that I was attempting with the Birthday cake so I spent quite a lot of time thinking about it and how it would work before I actually got down to the construction.

The cake itself was a chocolate sponge with a hint of espresso which added a lovely delicate twist to the overall flavour of the sponge.
 
One layer of the cake cooling


I went for a double layer of the chocolate sponge, covered in strawberry flavoured pink butter cream icing. With silver chocolate fingers wrapped around the outside and topped with strawberry flavoured pink chocolate buttons. All sounds simple enough, yet it still took the best part of six hours to make! Though having done it I think to do it again would be much easier and much quicker. I have always shied away of this kind of project for fear that I wouldn't be able to do it justice and was pleasantly surprised by the results. This was a big learning curve for me and I will use what I learnt to my advantage in the future.

The finished cake...

The finish isn't perfect but I was so very proud of myself for seeing the whole thing through and coming up with something pretty decent. Like I say, I learnt a lot of lessons doing this one so next time it will be much better. Though I will say I really liked the way the silver chocolate fingers looked against the pink of the icing, much better than plain white would have looked and added a touch of glamour.
 
They were super easy to make as well, simply get some Cadbury Dream chocolate fingers (I used just short of two packs on this cake) and lay out on a flat surface away from other food (and anything else that you don't want sprayed silver!) and spray evenly with some some Dr Oetker Shimmer spray. Leave the spray to dry for 10 minutes and then repeat the process until you have the desired level of colour. But beware! The spray has a knack of covering everything around it! It does wipe off very easily but still, don't say you weren't warned.
 
 
The oh so cute bunting you see adorning the cake was bought just before Christmas at a craft fair in Stafford and I sadly didn't keep the details of the person I bought it from. Though it should be relatively easy to make using two cake pop sticks and some fabric offcuts if you're the crafty type. 
 
All of this was done in secret whilst Littlest Baker was away at her Nanny and Granddad's for a few days for half term so was presented as a surprise on her actual birthday.
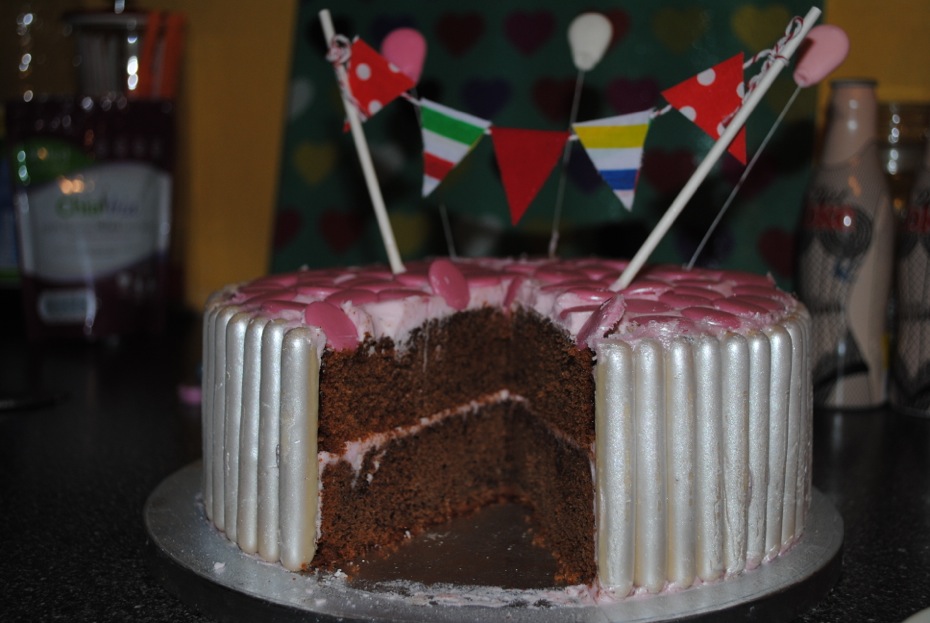


The cake was moist and the flavour of the strawberry butter cream and chocolate buttons worked wonderfully together with the chocolate and hint of espresso of the cake.

If you fancy making the Chocolate cake yourself the recipe is as follows:

 Ingredients
  1. 250g unsalted butter, plus extra for greasing
  2. 200g dark chocolate
  3. 1 tbsp espresso powder (I actually used a Sachet of Millicano)
  4. 100ml whole milk (I used skimmed, though whole would have a creamier texture)
  5. 250g self-raising flour
  6. 40g cocoa powder
  7. 250g caster sugar
  8. 4 large free-range eggs, lightly beaten
  9. 1 tsp vanilla extract (I used .5 tsp vanilla and .5 tsp chocolate essence)
  10. 150ml soured cream (I used 0% Greek yogurt)
Method
  1. 1. Preheat the oven to 160°C/fan140°C/gas 3. Grease and line a deep, 23cm round loose-bottomed cake tin, then set aside. Melt the chocolate, butter, espresso powder and milk in a heatproof bowl over a pan of barely simmering water until smooth. Remove from the heat and set aside.
  2. 2. Sift the flour and cocoa powder into a bowl, then add the caster sugar. Fold into the chocolate mixture along with the eggs, vanilla extract and soured cream.
  3. 3. Pour into the prepared cake tin and bake in the oven for 1 hour to 1 hour 10 minutes. The cake is ready when a skewer inserted into the centre comes out with some moist crumbs sticking to it but not any raw cake batter. Set aside to cool completely in the tin.

The cake would be delicious smothered in Chocolate fudge butter cream and topped with a rocky road style topping of crushed biscuit, marshmallow, fudge pieces and cherries....I feel another project coming on!


Friday, 15 February 2013

Yummy winter warming pie...

Being a bit behind on my posting has led to me telling you about this scrummy winter warming Chicken, leek and bacon pie a tad too late as the weather has *just* decided to start behaving in a more Spring like fashion. Not that I'm complaining of course, I'd begun to think I'd never feel warm again!

This pie was really easy to make and is perfect for the cold miserable days we've become accustomed to this winter.

I actually cheated very slightly and used a pack of Leek and potato pie mix from the supermarket. Which isn't really cheating, so much as making it much quicker and cheaper (it cost £0.85) to make a filling nutritious dinner.

I cooked two chopped chicken breasts and two chopped slices of bacon (fat removed) until cooked right through, I then turned down the heat and added the Leek and potato mix, two cloves of crushed garlic and two handfuls of chopped button mushrooms. I left this on a low/medium heat until the veg had sweated down and softened. I didn't add any of my own herbs to the mix as the shop bought veg mix had herbs in it and I didn't want to overwhelm them. Also, I really like garlic, so used 2 cloves, if you wish you could just use 1 or leave it out completely.

To make a creamy sauce I used some cornflour and milk mixed together and heated gently until thickened and poured this over the meat, vegetable mix.
The pastry I already had in my freezer, as leftover from mince pies at Christmas, I just about had enough to cover the pie! Phew! It was just a simple non sweet shortcrust pastry, rolled out to the thickness of a £1 coin. With the offcuts I made a few fancy snowflakes and my initials (just because). I brushed the pastry with beaten egg and baked the pie in the oven for around 25 minutes until the pastry was a nice golden brown.


Believe me, the photo doesn't do it justice! It was scrummy, even Littlest baker like enjoyed it and she usually shys away from Leek!

Tuna sweetcorn rolls

These were adapted from a recipe I found whilst looking for ideas for dinners for Littlest baker. I'm keen to try new and different meals for the family as I find that us, like most other families get stuck in a rut and need to find new favourites sometimes.

For us these rolls have become a new family favourite and are surprisingly quick and easy to make, which is always a bonus after a busy day at work/school.

The original recipe uses puff pastry and full fat mayo, which if you are feeling a bit more luxurious you could always use yourself, however I have recently changed my target weight in my slimming group and need to focus on getting down to it so need to go for the lower fat filo pastry and Greek yogurt alternative.

I used a tin of tuna,  handful of sweetcorn, approx 4 tbsp of 0% fat Greek yogurt, a splash of lemon juice, some black pepper and half a pack of frozen filo pastry.

Begin by mixing the (drained) tuna, sweetcorn, Greek yogurt, lemon and pepper. Then lay out two sheets of filo, one on top of the other. Being careful not to tear it as it is quite tricky to handle. Put a few tablespoons of the tuna sweetcorn mix onto the pastry in the middle and fold over the bottom and top edges to prevent the mix coming out when rolled. Next roll the pastry up. You should end up with something looking a bit like a 'closed' sausage roll. When all the tuna mix is used up (I got three reasonable sized rolls out of the mix) pop the rolls onto a baking tray and bake in the oven at around 190 degrees C for 20 minutes, or until the pastry is cooked and the filling hot.


I served ours with baked potato and mixed seasonal veggies, a very satisfying healthy dinner, enjoyed by all of the family.

If you like you could try different fillings in the rolls, I think something like chicken and leek or mushroom could work well, or why not add some mature cheddar to the tuna mix for an extra bit of flavour? 

Monday, 21 January 2013

Diet friendly cheese scones (or potato cakes).

OK, before I face a backlash I will come right out and say that these aren't reaaallly scones, not really. BUT! They are so quick and easy and can easily go with most meals that you should give them a try before dismissing them.
I'm not normally a scone person at all, never much seen the point. However as may have now become apparent my major weakness with food is bread (how did you guess?!) and I have been trying to come up with bread alternatives that are diet friendly, so imagine my joy when I found the recipe for these on the Internet.

They are more like potato cakes than scones and have the appearance of English muffins. Whatever they are I'm quite pleased to have discovered them.

I had around 120g of waxy potatoes (such as Charlotte potatoes) cooked, mashed and slightly cooled. I mixed approx 50g of cottage cheese and 60g of extra light soft cheese (I'd run out of cottage cheese and improvised) into the potato. I then mixed in two eggs (use more or less depending on the consistency of the potato mix) until it had all taken on a dough like consistency. For flavour I added a small amount of light extra mature cheddar and some salt and pepper.
 I then rolled the 'dough' to around an inch thickness and cut into rounds using a pastry cutter. Once all of the dough was used up I placed the scones onto a baking stone and topped with finely grated light extra mature cheddar (I used a Parmesan grater).


Ready for the oven


They baked in the oven for around 20 mins at 200 degrees C. Until the cheese had gone a nice golden brown.


They really do smell nice while they're baking and can be served with so many dishes...I'm thinking of trying one with some homemade tomato soup...perfect for this weather!


The obligatory snow shot. Sorry, had to be done!


Sunday, 20 January 2013

Pasta and Broccoli bakes

Just a nice quick and easy dinner/supper idea for you this week.
 I have done quite a lot of baking, but it has been mostly bread which I think I've bored you all enough with for now. I do have a sourdough starter in the making though, just reaching it's usability stage so watch this space...

This week I was trying to come up with some new or different dinner ideas as I felt like we were stuck in a bit of a rut. After a bit of scouting through some recipe books and on the Internet I came up with a cheesy pasta broccoli bake.  Quite simple and cheap but really filling and dead easy to personalise.

I boiled the pasta and veg and left it to cool for a few minutes. Whilst the pasta and veg was cooling I mixed up two eggs and some milk (approx 1/4 pint skimmed) and mixed some extra mature lighter cheddar into the eggy milk (approx 15g) and seasoned with salt and pepper.
I mixed the pasta and veg into the eggy milk mix and portioned it into 3 oven proof dishes. I topped it off with some slices of tomato and some more grated cheese (approx 30g total across the three).


I popped these into the oven at around 180 degrees C for around 20 minutes until they were cooked through and the cheese was nicely melted.


I served them with a mixed salad and some nice homemade bread. An excellent filling winter warmer with loads of veg and completely versatile. When I make these again I think I'll add a bit of pesto and some roasted Mediterranean vegetables and serve with some garlic bread...what will you do with yours?


Sunday, 6 January 2013

Fresh made bread...

You just can't beat the smell of fresh made bread wafting around (or even just the smell of the yeast fermenting). Today saw me make a full size 800g loaf, completely from scratch - not a packet mix in sight! I have decided (for now at least) to have a go at making all of my own bread rather than buying it from a supermarket, as I am finding the costs of bread rising sharply. Not to mention the invaluable experience I can get from regularly handling bread dough and experimenting with different types and styles.

Today's was a wholemeal, normal 800g loaf. I really need to get hold of a smaller loaf tin to make 400g loaves to fit in better with my diet, but I can work with this for now...


I chose to use dried active yeast rather than fast action as from what I've read about the different types of yeast available, the dried active does a better job than the fast action.

I started off by sifting the flour and salt together whilst starting the yeast off in some tepid water (2 parts cold to one part boiling) which had 1 tsp of sugar dissolved into it, and leaving it in a warm place to get working for 10-15 mins.
 
Once the yeast was reactivated (had a nice frothy head to it) I mixed it into the flour and kneaded the dough for a good 10 minutes (very good upper body workout!).
I left the dough, covered, in a warm place to rise (until it has doubled in size is a good guide, though I left it a while longer as I like a slow rise on my bread to develop the flavour).
 

Next came my favourite part - knocking back - I don't know why I love that part SO much, I think it's just a childlike glee when I knock the dough and it deflates like a balloon. I then kneaded the dough for around another 5 minutes and left it to rise again. This time I left it for around 45 minutes.

After the second rise I placed the dough, after another very quick knead into a well greased loaf tin (I used some 1 cal cooking spray to keep fat intake down) and popped it into a pre heated oven at 180 degrees for around 35 minutes, until it had a nice light golden colour on top and I tapped it underneath and it sounded hollow.


Et voilĂ !! One finished, lovely smelling and looking homemade wholemeal loaf - made by me! I have to say, I'm really pleased with the way the loaf turned out, I definitely recommend using the Dried active over fast action yeast any day (unless using a bread maker as Dried active is not recommended for them).
 
Thanks everyone for taking the time to visit - all nearly 300 of you!!! Please do keep coming back, and if you really don't want to miss out on one of my posts you can always subscribe via e-mail.


Saturday, 5 January 2013

Apricot jam hearts...

Hello again!

As I mentioned in my previous post I had a new baking book given to me as a Christmas gift and I was planning to have a go at one of the recipes.
Well, the recipe I went for was quite a simple one in terms of equipment and expertise but the results were very yummy! I made the 'Mulled wine stars' though changed it slightly to become Apricot jam hearts as I couldn't get hold of Mulled wine jam (apparently Tesco isn't quite that upmarket) and I didn't have any star shaped cookie cutters (they're on my shopping list).

I followed the recipe precisely as I wanted to get as close as possible to the result as I should using it, then work out what, if anything I would want to tweak in the future. The dough made in the recipe was quite 'short' which had me a little worried as I've never worked with such short dough though I needn't have been worried as the biscuits turned out just fine and delicious! My only slight negativity of the recipe as a whole would be that the biscuits themselves take quite a long time to bake as I needed to do quite a few batches in the oven (two halves of biscuits together, with jam in the middle) and that they were a bit too sweet for my tastes. The added sweetness came from the cinnamon in the dough, which gave a lovely dimension to the overall flavour, just perhaps with a little bit less sugar next time?

Irrespective of my personal tastes regarding the sugar/cinnamon combo the biscuits looked quite good for a first attempt. I think next time I will try to make them more uniform in size and thickness, otherwise I was quite pleased. As were my colleagues at work in our weekly meeting!
Not going to post the recipe for the biscuits as it was taken from a book and I don't want to be sued, though the book is Peggy Porschen and can be found in most good book shops.

I've also decided to give baking my own bread a go, and made two small (400g) loaves this week. Though I must confess I cheated and used a ready bought bread mix and used my bread machine! Can't beat the smell of freshly cooked bread wafting through the house...mmm!

Time permitting I want to have a go at making my own bread properly this week, probably just a plain old wholemeal loaf to begin, and possibly make a sour dough starter ready for next week.


Surprisingly good loaf from this mix!


The finished article! Not bad for a bread machine.


Come back soon to see what else I've been up to in the kitchen. Hoping to get hold of some fresh yeast for homemade crumpets either this week or next (and I will post the recipe for that one for you).