Friday, 11 October 2013

Apple and Bramble crumble cake

I was visiting my mother in law's allotment a month or so ago and was amazed at just how many blackberries she had growing there. I borrowed a tub from her and filled it with the intention of making some lovely seasonal bakes.

Something that I've always loved is crumble, served with custard though, not ice cream!
Though, it wouldn't have been very exciting just making a crumble and telling you all about it so I had a go at something a bit different that I found after a quick search around the Internet.

This crumble has a cinnamon sponge base, apple and blackberry filling and crumble topping. It looks impressive and smells amazing while it's in the oven.

For the sponge base:

150g caster sugar
3 large eggs
75g S/R flour

1/2 teaspoon of cinnamon 


Fruit filling:

2 cooking apples, peeled and chopped.
150g blackberries

For the crumble topping:

100g unsalted butter
100g Demerara sugar
1/2 teaspoon cinnamon 


Begin by creaming together the butter and sugar for the sponge base. When the butter and sugar are light and fluffy looking slowly add the egg. Then fold in the sieved flour/cinnamon and spoon the mix into a greased and lined 8" cake tin (preferably spring form).
Level out the cake mix and place the apples and blackberries on top.
Make the crumble mix by rubbing together the 
Bake in the oven (180c) for around an hour, though mine did take closer to an hour and a half. A skewer inserted into the middle (of the sponge) should come out clean.

Leave to cool in the tin and remove carefully. 

The simply pour over some delicious warm custard and enjoy! 


Proper home-made custard

Something that I've been meaning to attempt since long before this blog even started is making my own custard. I've just been waiting for the right moment to try it.
Finally with Autumn approaching and the whiff of crumble and pie in the air I felt that the time was right.

I used a simple, classic recipe for my custard. The only change I made to it was adding extra vanilla as at first taste I didn't feel that it had enough. Also, this doesn't make a really thick, rich custard. I will have a go at a different recipe for a richer custard soon, though I believe if you just add a touch more cornflour and/or an extra egg yolk that will do the trick.


  • Ingredients:

    570ml/1 pint milk
  • 55ml/2fl oz single cream
  • 1 vanilla pod or ½ tsp vanilla extract (I used 1tsp)
  • eggs, yolks only
  • 30g/1oz caster sugar
  • 2 level tsp cornflour


    Method:

    1. Bring the milk, cream and vanilla pod to simmering point slowly over a low heat.
    2. Remove the vanilla pod if using. 
    3. Whisk the yolks, sugar and cornflour together in a bowl until well blended.
    4. Pour the hot milk and cream on to the eggs and sugar, whisking all the time with a balloon whisk.
    5. Return to the pan, (add vanilla extract if using) and over a low heat gently stir with a wooden spatula until thickened (it coats the back of the spoon without dripping straight off).
    6. Pour the custard into a jug and serve at once.
    7. To keep hot, stand the jug in a pan of hot water and cover the top with cling film to prevent skin forming.

      The main thing that goes wrong with custard making is the egg scrambling when the hot milk/cream is added. I managed to avert this by not having the mix get too hot at any point. 
      It does take time and patience to make your own custard but the sense of pride and satisfaction you get when serving it with a home made cake or pie makes it completely worth it. 

      Feel free to play with the flavours when you've mastered the technique, I made a second batch using all milk (semi skimmed) no cream to make it a bit healthier. Or you could go the other way and make it with all cream no milk. 


Tuesday, 8 October 2013

Knorr - A tasty short cut. Review.

Recently I was asked if I'd like to try some Knorr stockpots and gravy pots for review. I've been meaning to try them since they were launched but always gone for the cheaper supermarket own brand instead.

I honestly didn't think there would be much if any difference between supermarket own and Knorr so I was pleasantly surprised when it came to reviewing them.

I tend to use stockpots for loads of things, not just the usual such as for gravy or sauce but for going into my risotto's or cous cous (so much nicer than using plain boiling water).

I tried out the chicken stock pot in a Saffron risotto simply by making up a pint of chicken stock using the Knorr stockpot and adding a small pinch of Saffron to the stock, letting the flavours infuse together before adding to the Arborio rice.


A beautiful flavour combination! The chicken stock smells and tastes just like roast chicken, without the fuss of boiling the bones and reducing down the liquid. Bliss!

I then turned my attention to the vegetable stock cubes. I had roasted a large gammon joint which was being used to make many different meals. One of which was a 'diet friendly' Carbonara. I fried some sliced mushrooms in some Frylight (low cal cooking spray) and chucked in some of the sliced chopped gammon. Next I added 300ml of vegetable stock and simmered until the liquid had reduced by half.
The reason I added stock to my Carbonara was due to me using soft cheese spread in place of cream as is traditional which I find needs a little liquid to stop it becoming dry.
Next I added two egg yolks mixed with 200g extra light soft cheese and added some (cooked) pasta and garden peas.
Heat it all through until the egg is set and enjoy!


Also using the gammon roast, I made littlest baker a traditional roast gammon dinner and made up a gravy pot as a quick, tasty alternative to gravy granules (which I really prefer not to use if I can help it.) A roast dinner with the trimmings made quickly using micro steam veg pouches, my Airfryer for some of the best home roast potatoes I've had in years! and a Knorr gravy pot for the gravy. So simple yet so good! 


Monday, 30 September 2013

Sweetpea pantry - making baking easy, delicious and fun. Review

It's been a few weeks now since I visited the Cake and Bake show London with the littlest baker and my mother in law. We went on a Saturday which was a sell out and wow was it busy! We could hardly move for people though I did manage to squeeze up to a few stalls to get a better look at the wares and pick up some samples and ideas. There were some really delicious looking and tasting products for sale as well as baking celebs meandering around happily signing autographs and posing for pics. All in all a great day, I will definitely be back for 2014!


One of the things I picked up to try whilst I was there was Sweetpea Pantry's Grainy Brainy Pancakes mix.
Sweetpea Pantry is all about making baking with kids easy, delicious, fun and wholesome. They provide all the necessary dry ingredients in a mix with instructions on how to help your little one create their very own baked goods.


Littlest baker absolutely LOVES breakfast, it is by far her favourite meal of the day. So what better time to try the Grainy brainy pancakes than for a yummy Saturday morning breakfast? 

It couldn't have been more simple, all that I needed to add to the ingredients was 1 egg and 1 cup of milk.
After that it was pretty much all up to the Littlest Baker, until it came to the cooking part.
The pancake batter was mixed together in no time, meaning that for a little one with a short attention span the work was done and the pancakes ready in all of about 10 minutes.


One pack of the mix (there's 2 in the box) made around 8 decent sized pancakes which fed the three of us well.
Littlest Baker had hers with some maple syrup and cinnamon sprinkled over them, I had maple syrup and banana just to make it a touch more filling. Though as the mix has no sugar added it is perfectly possible to make the pancakes savoury by adding cheese and ham perhaps for a lunch box treat or brunch.

Ready to tuck in!
What helps to make these mixes from Sweetpea Pantry so special is that they have no added sugar or salt, they are gluten free, contain wholegrains and have nothing artificial. So that also means no guilt from me for giving Littlest Baker pancakes for breakfast. 

I'm off now to look at the Sweetpea Pantry website to see what we can try next.


Saturday, 24 August 2013

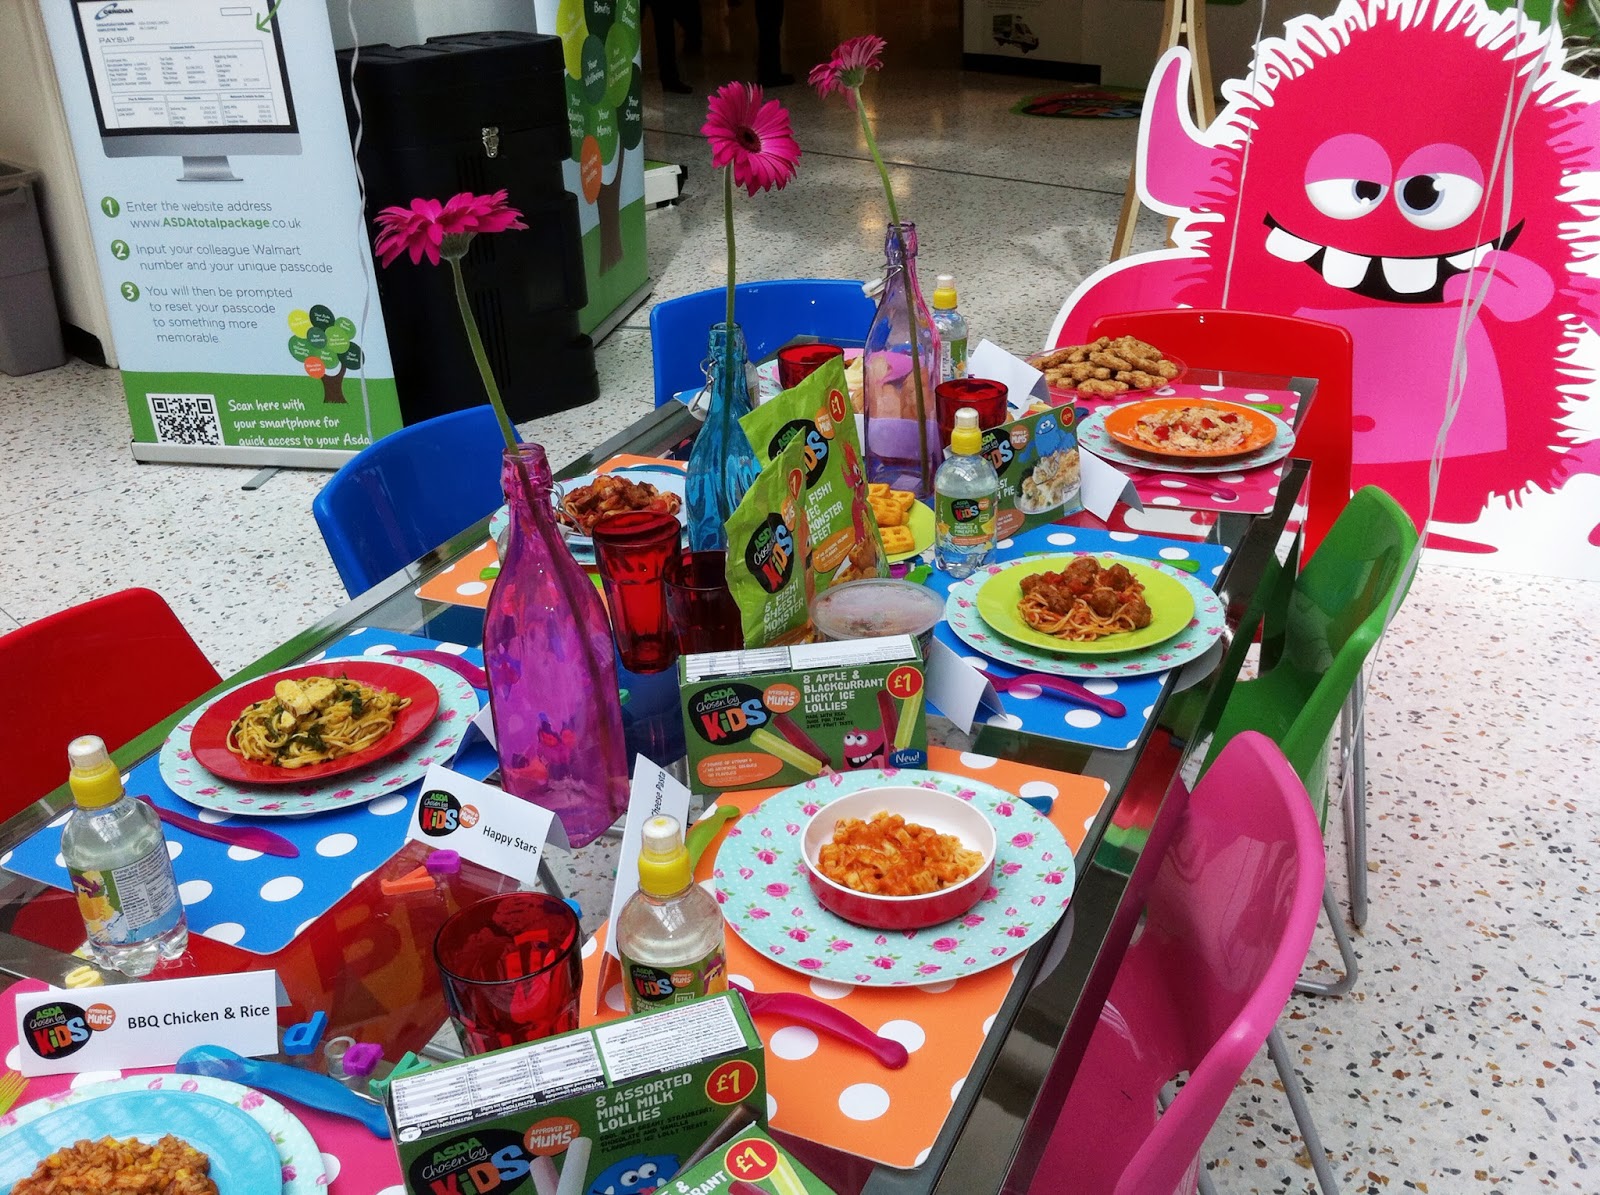
Asda's new Chosen by Kids range - Review

Asda are bringing out some innovative new products and re launching some of their older products under their new Chosen By Kids range.

The range will feature a huge 180 products spanning across all meals of the day. The entire Chosen by Kids range has been tasted by kids and approved by mums.


To mark the launch of their Chosen by kids range Asda held a special event for bloggers and their little ones to give us an exclusive insight into how the tasting process works and have a sneak preview of some of the food in the range.

Myself and Littlest baker were invited up to Asda's home office (Asda house) in Leeds to be a part of this special event. Leeds is a fair trek from Bedford so our hopes were high of having a good time at Asda house.

Upon arrival we were immediately immersed into the Chosen by kids range as Asda house had a 'monster makeover' in their hub. Complete with the Chosen by kids cheeky monster characters milling around having photo ops and laughs with the mums and little ones.

Littlest baker meeting Trixta

We were walked through the area to explore the breakfast, lunch, dinner and snacking ranges and briefed about the range in general by Product development director Gail Paddy. 
Breakfast

Lunchtime

Dinner

After being shown the meal range by Gail we were taken away into a separate room and given an opportunity to try out some of the new products and even rate them using special 'yum' or 'yuk' paddles.
Among the items we tried were Cheesy pasta shapes, which had a definite 'yum' paddle held up by Littlest baker, a squeezy yogurt pouch, another 'yum' paddle and Monster feet which Littlest baker was a bit undecided about. 

Littlest baker was very happy with the squeezy yogurt.


Every product has been tried and tested by kids, who enjoy the taste and then approved by mums. The mums approval comes from the point of view of nutrition, convenience and appeal.
Many of the products contain hidden vegetables and fruit taking some of the guilt out of giving your kids a convenience food knowing they will still be getting their vitamins. With Monster Mash, which is a mix of mash potato, peas and broccoli, or the carrot and Potato waffles. 
The Chosen by kids range has been designed to be a solution for mums juggling different family mealtimes with after school activities or working late, without breaking the bank as the prices start as low as 58p (Instant porridge pots). Incidentally the instant porridge pots needn't be a worry with the heat burning little hands as Asda have developed a thermal packaging that stays cool to protect them. 

Snacks are also covered with options such as Mini Fruit Bags (five for £2) or Jelly with real fruit pieces, or Lime flavoured raisins ('yum' vote from Littlest baker). 

Littlest baker was impressed with the range of products available and I'm sure with the kids going back to school really soon I will be featuring some of the products in her lunch boxes and after school when time is a premium due to after school activities.  I especially think she wants to try the Meatballs and Spaghetti that we saw on the Dinner table in the hub, it looked the perfect size for her appetite.

All set for going back to school.


How your weeks meals could be planned using Asda's new range.


Cappuccino pots

I've recently been trying out recipes using gelatine with varying results. I've tried marshmallow, which worked alright but was a bit too wet and sticky. It seems quite hard to find a really good marshmallow recipe, which is a shame. So after the disappointing results I had with marshmallow I turned my attention to cheesecake, which actually turned out fine, just needs a little bit of tweaking with the flavours then I will blog about it.

I then got looking through a recipe book I have for the slimming group I belong to and found a dessert recipe which makes a coffee mousse. This is my own twist on that recipe.


Ingredients:

2 tsp powdered gelatine
5 level tbsp low fat crème fraiche
5 tbsp fat free natural yogurt (I used 0% Greek yogurt)
2 tbsp v strong filter coffee or espresso
3 tbsp sweetener (I used 1 tsp liquid sweetener)
2 large egg whites
10ml Tia Maria (optional)
2 tsp cocoa powder

Method:

Pour 2 tbsp of boiling water into a small bowl and sprinkle the gelatine in. Mix well until the gelatine is dissolved and put to one side until needed.
In a separate bowl mix together the crème fraiche, yogurt, cocoa powder, coffee, Tia Maria (if using) and sweetener. 
Whisk the egg whites until stiff, I used my Russell Hobbs Kitchen machine for this but you could do it by hand if you don't have an electric whisk.
Mix the gelatine into the coffee mixture and carefully fold the egg white into it, being careful not to knock the air out of it.
All that's left is to divide the mix into your chosen serving pots or glasses and leave to set for around 2 hours. 
I served mine in some vintage tea cups that I bought recently, though this dessert is so versatile that it could be served in most things, I think Martini glasses or espresso cups would look really good with this.
This is a fantastic dessert to have in your repertoire for something a bit fancy for a weekend pudding or tarted up a bit with some chocolate or Baileys served along side at a dinner party.  

Lollibopping with the littlest baker

It's summer time and that means festival season is well under way. The festival scene has really come into its own in the last 10 years with more and more festivals popping up each year for just about every conceivable member of society.
I remember the days of being excited about going to festivals, a day or if you're really lucky a whole weekend spent with your mates in a mud sodden field (Great British weather) listening to some of your favourite bands and maybe some more obscure ones thrown in for good measure. Going home exhausted and exhilarated with some great memories of a day well spent.

Move on to me now being 30(!) and a married mum of one and those days seem behind me for now. This festival season there was just one festival that I was excited to visit and that was Lollibop!
Lollibop is a festival all about children. Littlest baker was just so excited to be having a day out in London and going somewhere that was all about her! 


We didn't manage to see everything and do everything as there was just so much that trying to do it all would have been akin to a military manoeuvre and when you have a 5 year old in tow sometimes its easier to just go with the flow.
We did however get to watch the fabulous Katie - CBeebies I can cook live on the cooking stage. She wasn't cooking, but at 8 months pregnant did a magnificent job of entertaining her audience with singing, dancing and jokes. Littlest baker made her way to the front of the stage and got stuck in with joining in with the action. 


We even managed to squeeze in a photo with Peppa Pig and the Cloud babies! 
We watched the cast of The West End show Peter Pan (starring Stacey Solomon) on the main stage whilst we sat and ate our lunch. 
The whole thing was a star filled extravangza - Dick and Dom were on the main stage following the Peter Pan songs, Sid and Andy (CBeebies presenters) were in a smaller tent. There were lots of photo opportunities with Mr Men, Postman pat, Shaun the sheep and even Justin Fletcher was there!


What was brilliant about the festival was that all of this and the rest including face painting was included in the ticket. So often you take your child for a day out, pay the entry fee to wherever it is and get hit for everything else they want to do once you're in. How refreshing that this wasn't the case at Lollibop. The food stalls were reasonably priced, we got a toastie for littlest baker at £2.50, there was also a Paella stall, hot dogs, burgers, churros (which I may have treated myself to) and some clever person had thought about what kids really like to eat and had a Fish finger butty stand.

Yes! She is 'feeding' a pineapple, I didn't get it either! 


As you can imagine there were plenty of stalls all giving out free samples/money off vouchers to advertise their business - pretty much all of them relating to children of varying ages. There were of course the odd stall aiming themselves at the grown ups, we are after all the ones controlling the purse strings. I did get a few bloggers samples from some of these stalls which will be reviewed in a seperate post.
As you would expect the sponsors and partners of the festival were well represented across the park with the one standing out the most in my opinion being Chobani who seemed to be everywhere I looked. Lots of their posts were being handed out and I bagged myself a few which made a handy breakfast to keep me fuelled for the busy day after the early start I'd had. I'm sure the presence Chobani had a the festival can only help them with their move towards UK yoghurt market dominance!

Thanks to Chobani for allowing myself and littlest baker to be your guests at the festival, we had a great day with lots for the Littlest baker to tell her friends about the day she went to her first festival.