Saturday, 2 August 2014

Scrumptious summer shortbread

I have been asked by Nielsen-Massey to use some of their flavours and extracts. Vanilla is easy, it goes in lots of things and always tastes amazing. I love vanilla extract, but really don't like the cheap stuff I don't think it's even made fom vanilla. I vaguely recall reading somewhere that it comes from some kind of tree bark. So, splash out on the nice stuff, you won't need to use much so it will last a long time.
Something I've not used in my baking before is lemon flavouring. So I tried to get a bit creative and came up with a Lemon and Lavender shortbread.  Both perfect summer flavours. 

Ingredients:
250g unsalted softened butter
100g caster sugar
1/2 tsp lemon flavouring
250g plain flour
100g cornflour
1/2tsp salt

Method:

Blitz the sugar, lemon flavouring, lavender and butter together in a food processor until creamy. Add the flour, cornflour and salt. Pulse the food processor until the mix beignets to come together in clumps and turn out onto a floured surface.
Bring together fully into a ball being careful not to over work the dough as that will prevent the end biscuit being 'short' and crumbly.
Roll the dough out to a 25cm circle, use a cake tin or plate as a guide and trim around to get a neat edge.
Use two fingers to crimp the edge. 
Using a fork mark out 8 even slices in the dough.
Place on a tray and put in the fridge for 30 mins.
Transfer the tray to a pre heated oven to 189c/160 fan/ gas 4. Bake for around 25 minutes or until golden brown and cooked through.
Leave the shortbread to cool completely on the tray, then using a sharp knife divide into peticoat tails along the lines marked out by the fork prior to baking. 

The lemon gives a lovely citrus refreshing flavour with a slight aftertaste and scent of the lavender. Enjoy with a cup of tea in the garden.


Banana bread - a healthy(ish) option

I've deliberately not been baking much recently. As for various reasons that I won't go into I have put on around 7lb over the past year, and I'm struggling to get it back off.
So when I found myself with 8 bananas that had been delivered on my online shop a bit squished and bruised I needed to try to find a healthy(ish) way of using them rather than waste them. I didn't just eat them as I hate bruises and brown bits on my bananas. 
I turned to the tried and tested banana bread. It's the easiest way I know of using up past their best bananas. 
I tweaked the recipe a bit to keep it as saintly as I could, well actually it could be better as I could have used honey in place of sugar but I didn't have enough in the cupboard to do that.

I used 0% fat Greek yogurt in place of half of the butter. I don't believe it's possible to completely replace the butter as baking is a bit of a science and needs certain properties to be present for the right chemical reactions and therefore the right results. Which is one reason I don't use sweetener when I bake, I don't think it works as a proper substitute for sugar and the end result is in adequate. Also, I don't skimp on my Greek yogurt, I don't like Greek syle yogurt, it's watery and doesn't taste anywhere near as good. The only time I use Greek style is when making curry. This recipe uses a very small amount, so you might think it's a waste to spend on it, but Greek yogurt and honey with fruit is a delicious snack/breakfast/dessert.

This is a recipe that you could have the kids helping with, so perfect for rainy days. With the added benefit of knowing that the snack they will be eating won't be full of additives and things you can't pronounce.

Ingredients:
285g/10oz self raising flour
1/2tsp salt
1/2tsp bicarbonate of soda
55g butter (I used flora ex light)
55g 0% fat Greek yogurt
170g/6oz caster sugar
2 eggs
4 bananas mashed
1 tsp vanilla extract (Nielsen Massey is the best)
85ml/3fl oz of buttermilk or milk with a dash of lemon juice added to it.

Method:

Sift together the flour, salt and bicarb. Set to one side.
Then cream together the sugar, butter and yogurt until light and fluffy. 
Add the bananas, eggs, milk and vanilla extract to the sugar and butter mixture. Stir until everything is incorporated. Don't go too mad with this part though as the banana needs to stay a bit lumpy (the way I like it anyway). 
Fold the wet ingredients into the dry, just until the flour cannot be seen anymore. Over doing it at this stage will stretch the gluten in the flour resulting in a dense chewy cake. 
Pour the batter into a greased and lined 400g loaf tin. 
Bake in a pre-heated oven at 180c/160 fan/gas 4 for around an hour, or until well risen and golden brown.
Allow to cool in the tin for 5 minutes then transfer to a wire rack until cooled completely.

Littlest baker likes hers served with some peanut butter spread on it as a treat.


Saturday, 26 April 2014

A little something to finish off the festivities

In December I was asked to sample a cheese and wine combination from Aldi.
Aldi have paired up with Master of Wine Sarah Jane Evans to create some lovely cheese and wine combos which complement each other and are perfect for finishing off a meal. 

I was sent the Specially selected Cheeder with garlic and herbs, matched with The exquisite collection Limoux Chardonnay.


The cheddar had a lovely strong taste which held up well to the crisp acidity of the Chardonnay.  

The cheese went well on my Christmas cheese board along with the usual Stilton and Bree etc... The Chardonnay a welcome addition to the after dinner drinks and cheeses. 

Aldi are proving that there is no need to go to the bigger named supermarkets for your entertaining needs. In the current economic climate and particularly when we're all watching the pennies around Christmas and New Year I really don't see you you would pay more for something when you can get something of the same quality for less. 


Time to be daring...

 
I was asked by Knorr to sample some of their new flavour pots in my food. I have noticed them on the supermarket shelves and been tempted to buy them so thought I'd give it a go.
 
Having recently discovering pinterest I thought I'd have a quick look on there for recipes using some store cupboard ingredients that I could possibly adapt. What I came up with is something that I'd have never normally either tried or attempted to make, but I was really surprised (so too was hubby!) by what I came up with and will definitely make it again.
 
I'd never normally attempt a curry mainly because the list of ingredients for a curry is usually daunting, with so many different spices to be included, many of which I've not heard of or simply don't want to but to then have them taking up space in my kitchen for the next year!
 
That's where the Knorr Curry pot was so good to have, it has a combination of 13 spices such as cumin, cardamom and cloves. No more having to work out just the right measurement of spices to get the right heat or flavour combination. It has a good 'kick' to it but as I've learnt over the years this can be toned down to suit your tastes by clever use of yogurt/ cream.
 
This meal is a fantastic mid-week meal that can be thrown together in 15 minutes using store cupboard and fridge basics. It is all gluten free (including the flavour pot).
 
Here's my take on a Chickpea Dahl - Beginner baking style (with some help from Knorr)
 

Ingredients:

400g can of chickpeas
1Knorr curry flavour pot
1 Red Onion
250g carton passata
400g can Light Coconut cream/milk
Curly Kale
 
Finely dice the onion and  fry in a heavy based pan on a med/low heat using low cal cooking spray. Fry until soft, then add the passata, and curry pot.
mix together until the curry pot has been well incorporated, next add the chickpeas and coconut cream.
Simmer for 5 mins then around 3-4 minutes before serving add the curly kale and cook until the kale is wilted.
 
 
Served with steamed curly kale and a salmon fillet.


Tuesday, 26 November 2013

Winter warmers

I have been thinking about winter warming recipes recently, trying to settle on one particular recipe that I like to eat more than others on the cold, dark, late Autumn days.
I thought about sausage and mash, soup, chicken pie but the main meal that my mind kept wandering back to was Shepherd's pie. 
But me coming along here to tell you how to make a bog standard shepherds pie would be boring, so I came up with a bit of a twist and re-named it to be Shepherd's cobbler. 

Full of flavour and veg, this is a reasonably priced meal to make this should be a hit for all of the family.

Ingredients:                                                                

250g lamb mince
1 white onion, finely chopped
1 garlic clove
Handful of chopped mushrooms
Handful of garden peas
1 tbsp balsamic glaze
1 carrot, finely chopped
Small sprinkle cinnamon 
1 Knorr herb stock pot
1 Knorr onion gravy pot
Salt + pepper to season

For the herby dumplings:

1 cup plain flour
1/2 cup cornmeal (not to be confused with cornflour!)
1 1/2 tsp baking powder
1 Knorr herb stock pot
1tsp sugar
Small sprinkle cinnamon
Some luke warm water


Method:


Begin by frying the onion on a medium heat until softened, then add the lamb mince and garlic until the mince is browned.
Whilst the onions and meat are cooking, have the carrot par-boiling in a separate pan ready to add to the mix when needed. 
When the meat is browned, remove some of the excess fat and add the mushrooms. 
Season with salt and pepper to taste.
Add the balsamic glaze, cinnamon, peas, carrots and herb stock pot. 
Cook on a medium heat to melt to stock pot and get all of the ingredients well incorporated. 
Next, make up the onion gravy with the water from the par-boiled carrots. Using the carrot water retains the vitamins and some of the flavour leached from the carrots when being cooked. 
Add the onion gravy to the meat mixture and stir well. 


That's the main body of the dish ready, pour into a shallow casserole dish and put to one side whilst preparing the dumplings.


Method for dumplings:

Place the flour, cornmeal, baking powder, sugar and cinnamon into a bowl.
Melt the herb stock pot in around 1/2 pint of hot water and allow to cool to be luke warm. 
Slowly incorporate the stock into the dry ingredients until you have a smooth, not sticky dough.
When you have the right consistency, knead the dough for 2 minutes. 
Shape into small balls and flatten slightly. 
Drop the dumplings onto the top of your shepherds pie mix. 

To finish off the cobbler, glaze the top of the dumplings with a beaten egg and bake in the oven, heated to 160c fan, 180c for around 25 minutes.

I served mine with some baby new potatoes steamed in the microwave using Colman's clever Season and steam pack. Which even people passing the front door commented on how lovely they smelled!


A delicious winter warming, family favourite. In fact, reading on Facebook as I write this post there are three other people I know, all eating Shepherd's pie for their dinner tonight too. If only they had this recipe!

If you still have a little room left after your dinner why not follow up with a Hot toddy Tea cake?


 I tried to come up with a cake that would go well with a nice cup of tea and a Sunday afternoon movie on the sofa. I think this ticks all of the boxes, and is such a simple recipe.
 

Ingredients:

300g dried fruit
225ml hot tea - I used PG Tips 'the Rich one' a good strong proper tea.
Juice and zest of one orange
50g butter
100g light brown sugar
1 Egg
225g self raising flour
50ml Whisky/Bourbon

For the drizzle:

6 Tbsp icing sugar
1 Tsp Lemon juice
Between 25 and 50ml Whisky/Bourbon


Method:

Cover the mixed fruit with the hot tea, orange juice and zest and Whisky/Bourbon. Cover with cling film and leave for a minimum of 4 hours, or even better over night.

Pre-heat the oven to 160c fan, 180c/gas 4
Grease and line a 2lb loaf tin (though I used my Bundt tin, just because).
Beat together the butter and sugar until light and fluffy. Next beat in the egg and finally the flour.
Then stir through the fruit and remaining liquid and mix until well combined.
Pour the mix into your tin, levelling the surface with the back of a spoon.
Bake for approximately 1 hour, or until a skewer comes out clean from the centre.

While the cake is cooling slightly mix up the drizzle topping.  Do this by mixing the icing sugar, lemon juice and bourbon until you have a thick yet still runny consistency.

Make small holes all over the cake and gently drizzle over the icing, allowing it to soak down into the cake.

Leave to cool, then slice and enjoy with a cup of tea and a good film.


I was asked to create a winter warming recipe on behalf of Unilever as a part of a competition for Bloggers. I was provided with samples of some products to use to create my recipes and include in my post.
Having said this, all views in this blog are my own and unbiased by the samples provided to me.
Thanks to Unilever for giving me the opportunity to work with you and enter your competition.


Sunday, 17 November 2013

Get ready for Stir-up Sunday

Stir-up Sunday is fast approaching, in fact, it's just a week away!
Stir-up Sunday is the last Sunday before Advent so called because the opening words of the Collect for the day (the main prayer) in the Book of Common Prayer of 1549 (used in Anglican Churches) says:
"Stir-up, we beseech thee, O Lord, the wills of thy faithful people; that they, plenteously bringing forth the fruit of good works, may of thee be plenteously rewarded; through Jesus Christ our Lord. Amen."
which was used on the last Sunday of the Church year, also because this day is the day upon which the Christmas pudding should be made in order to mature in time for Christmas day. The two have become interlinked over the centuries.


In preparation for Stir-up Sunday I have been researching Christmas pudding recipes and sourcing ingredients and pudding bowls to make my Christmas pudding in. 
 
 
There are some long held traditions when it comes to Christmas pudding and as I was brought up by a somewhat superstitious mother, I intend to continue with some of these traditions as I make my own Christmas pudding.
 
 
The first is to place a charm or coin of some sort into the pudding before it is cooked. Allowing it to become hidden and subsequently found when being eaten. These coins and charms are said to bring luck to whomever finds it.
A note of warning though, if you do place something into your pudding, please be sure to inform anyone who eats the pudding to prevent them choking on it! If serving to children, I would suggest leaving it out entirely.
 
I have a Farthing and a half penny to go into mine, in the absence of a Sixpence. 


Ingredients:

1 large cooking apple
1/2 tbsp. nutmeg
100g candied peel
500g raisins
70g plain flour
50g fresh white bread crumbs
50g light muscavado sugar
1 tbsp. Brandy
125g butter (cold, from the fridge)
2 small eggs
 

Method:

 
Peel, core and chop the apple
Chop the candied peel.
Mix with the remainder of the ingredients, except the butter.
Grate half of the butter into the bowl and stir to combine. Repeat this until all of the butter is grated into the mix and combined.
Then, you will need to gather your family around as it's time to stir! A tradition on Stir-up Sunday is to have each member of the household stir the pudding mix three times, seeing the bottom of the bowl each time and making a wish.
The mix is ready (when everyone has had a stir) when the mixture subsides slightly after each stir.
 
Generously butter a 2 pint pudding bowl and put a circle of greaseproof paper in the bottom.
Pour the mix into the bowl and pack in tightly.
Cover with a double layer of greaseproof paper or baking parchment, pleating it to allow for expansion, then tie with string (keep the paper in place with a rubber band while tying). Cut off any excess paper.
Then place the pudding on a large sheet of foil and bring the edges up over the top, then put another sheet of foil over the top and bring it down underneath to make a double package (this makes the pudding watertight). Tie with more string, and make a handle for easy lifting in and out of the pan.
 
The pudding needs to be boiled for 8 hours, topping up the water when necessary (do not let it boil dry). At the end of the 8 hours, carefully remove the pudding from the pan and allow to cool over night.
The next day, remove all of the foil and greaseproof paper and replace with clean, new greaseproof paper and foil.
The pudding is then ready to be stored in a cool, dry place until Christmas day.
To serve the pudding on Christmas day, re-heat it by boiling it for one hour. Unwrap it carefully and turn out onto a plate or bowl.
If you're feeling adventurous, flame the pudding by pouring 3 tbsp. of warmed brandy over it and setting it alight. Note: be very careful with flames, especially if there are children around!


Happy Birthday Ed!

Another Happy Birthday post, this time for my hubby Ed.

This is a bit of a belated post as it was actually his birthday way back in October, though time constraints have prevented me from getting my posts done.

I really wasn't sure what sort of cake to do for Ed. I wanted it to be a bit different to the usual sponge that  he gets from me. Then I came across a recipe for a Peanut butter cheesecake and thought I'd give it a go. I know it's not really what you would do for a birthday cake but it certainly still went down well.


Here's how to make it yourself.

Ingredients:

For the base
  • 50g salted pretzels
  • 1tbsp cocoa powder
  • 50 unsalted butter, melted
  • 150 choc chip cookies

For the cheesecake filling
  • 1 Large egg yolk
  • 100g light brown soft sugar
  • 300g peanut butter
  • 200ml double cream, whipped to soft peaks
  • 250g Quark
  • 250g Mascarpone
  • 2 Large eggs

For the topping
  • 1 Pack of Caramel nibbles
  • 50g Dark chocolate (melted)

Method:

Heat the oven to 150c (130C fan).

Prepare the base by blitzing the pretzels, cookies and cocoa powder together in a food processor until they are fine crumbs. If you don't have a food processor, put the ingredients into a sandwich bag and bash with a rolling pin to get the same results. Then mix in the melted butter and stir (or pulse) until well combined.
Push the mix into the base of a 20cm tin (needs to be a loose bottomed tin). Level out the mix and put in the fridge to chill.

Whilst the base is chilling in the fridge, make the filling.
Begin by beating the Quark, Double cream, Mascarpone and sugar until smooth. Then beat in the peanut butter and eggs until the mixture is smooth.
The peanut butter needs to be room temperature to be mixed in properly, also, you may find this easier using an electric whisk or stand mixer.


Do not be tempted to over beat the mix at this stage or you will lose the texture from the whipped cream.
Spoon this mix over the chilled base and bake in the middle of the oven.
To help prevent the cheesecake drying out and cracking in the oven, place a roasting tin half filled with boiling water in the bottom of the oven whilst it is baking.
Bake in the oven for about 1 hour to 1 hour 10 mins, the cheesecake needs to be set, with a bit of a wobble in the centre.
Remove from the oven and gently run a knife around the outside of the cheesecake and leave to cool overnight in the fridge.


The next day, as you are getting ready to serve the cake remove it from the tin. For the topping, melt the dark chocolate and drizzle over the top of the cake. Whilst the chocolate is still runny place the Caramel nibbles on top of the cake in whatever pattern you like.


Saturday, 16 November 2013

Holidays are coming

It's getting to the time of year where thoughts are rapidly turning to all things Festive. The shops have been selling it to us for months already. The more organised of us have bought most of our presents and started planning for the Festive feasts ahead. The less organised are burying their heads in the sand and saying 'Christmas where? When?'
 

Whether you are the former or latter you will most likely be adding Christmas cake to your list, and here I will give you my recipe for a lovely, fragrant, yet brilliantly simple Christmas cake to rival those mass produced efforts that the shops peddle. I really think that homemade Christmas cake and pudding is so much nicer than the shop bought, and it can be a family tradition to all make a wish when stirring; as it was in my household when I was growing up.

It's one of those things that I think people are afraid to try as they think it will take a long time or be difficult. I can assure you, it isn't!

You will need a 20cm Round cake tin, or 18cm Square tin (and plenty of grease proof paper)

Ingredients:


  • 200g currants
  • 200g sultanas
  • 200g raisins
  • 75g candied peel, chopped
  • 250g unsalted butter, softened, plus extra for greasing
  • 250g light soft brown sugar
  • 4 eggs
  • 200g plain flour
  • 2 tsp mixed spice
  • 150ml alcohol of your choice (usually something like Sherry, Brandy or Rum)
  • Zest and juice of 4 clementines
  • 1 tbsp black treacle


  • Method:

    A day or two before you make your cake soak the dried fruit in the alcohol, zest, and juice in a covered bowl or tub.
    If you forget to do it the day before you can heat the dried fruit gently in a pan with the alcohol, zest and juice and leave it to cool to soak up the juice.


    Begin by heating the oven to 140c (130c fan). Grease and line the cake tin with greaseproof paper. You need a circle to cover the bottom of the tin and enough to go around the inside of the tin with around 3cm of paper of the top.
           
    Then using a clean bowl or your stand mixer (makes life a bit easier) beat together the butter, sugar and treacle until light and fluffy.

    Next, beat in the eggs, one at a time (to prevent the mix curdling).
    Fold in the flour, mixed spice and fruit (with remaining liquid).


    When the batter is well mixed, spoon into the lined cake tin and level out with the back of a spoon. 


    Bake in the oven for 4- 4.5 hours. Until the cake is cooked through and a rich golden brown colour.
    Check on the cake after 2 hours, if it already has a good golden colour it can be covered with foil or a circle of greaseproof paper to prevent it burning before it is cooked through.


    Allow the cake to cool in the tin then carefully remove it and remove the greaseproof paper. To store the cake re-wrap it in clean, fresh greaseproof paper, making sure you cover the top as well with a separate circle of paper.
    Store in an air tight container in a cool place. The cake can be stored for up to 6 months, so plenty of time to make this ahead.
    Feed the cake every couple of weeks with some more alcohol (if you choose) or for a non alcoholic version you could use tea. Just skewer the cake in several places and drizzle over around 1 tbsp of your chosen liquid. Just be sure to re cover the cake well after each feeding to keep it fresh.

    I haven't decorated my cake yet, and as I can't really do sugar craft it will have a simple marzipan covering topped with plain white icing. Wrapped with a festive cake ribbon and topped with an edible decoration. Look out for pics over the next few weeks.

    Friday, 11 October 2013

    Apple and Bramble crumble cake

    I was visiting my mother in law's allotment a month or so ago and was amazed at just how many blackberries she had growing there. I borrowed a tub from her and filled it with the intention of making some lovely seasonal bakes.

    Something that I've always loved is crumble, served with custard though, not ice cream!
    Though, it wouldn't have been very exciting just making a crumble and telling you all about it so I had a go at something a bit different that I found after a quick search around the Internet.

    This crumble has a cinnamon sponge base, apple and blackberry filling and crumble topping. It looks impressive and smells amazing while it's in the oven.

    For the sponge base:

    150g caster sugar
    3 large eggs
    75g S/R flour

    1/2 teaspoon of cinnamon 


    Fruit filling:

    2 cooking apples, peeled and chopped.
    150g blackberries

    For the crumble topping:

    100g unsalted butter
    100g Demerara sugar
    1/2 teaspoon cinnamon 


    Begin by creaming together the butter and sugar for the sponge base. When the butter and sugar are light and fluffy looking slowly add the egg. Then fold in the sieved flour/cinnamon and spoon the mix into a greased and lined 8" cake tin (preferably spring form).
    Level out the cake mix and place the apples and blackberries on top.
    Make the crumble mix by rubbing together the 
    Bake in the oven (180c) for around an hour, though mine did take closer to an hour and a half. A skewer inserted into the middle (of the sponge) should come out clean.

    Leave to cool in the tin and remove carefully. 

    The simply pour over some delicious warm custard and enjoy! 


    Proper home-made custard

    Something that I've been meaning to attempt since long before this blog even started is making my own custard. I've just been waiting for the right moment to try it.
    Finally with Autumn approaching and the whiff of crumble and pie in the air I felt that the time was right.

    I used a simple, classic recipe for my custard. The only change I made to it was adding extra vanilla as at first taste I didn't feel that it had enough. Also, this doesn't make a really thick, rich custard. I will have a go at a different recipe for a richer custard soon, though I believe if you just add a touch more cornflour and/or an extra egg yolk that will do the trick.


    • Ingredients:

      570ml/1 pint milk
    • 55ml/2fl oz single cream
    • 1 vanilla pod or ½ tsp vanilla extract (I used 1tsp)
    • 4 eggs, yolks only
    • 30g/1oz caster sugar
    • 2 level tsp cornflour


      Method:

      1. Bring the milk, cream and vanilla pod to simmering point slowly over a low heat.
      2. Remove the vanilla pod if using. 
      3. Whisk the yolks, sugar and cornflour together in a bowl until well blended.
      4. Pour the hot milk and cream on to the eggs and sugar, whisking all the time with a balloon whisk.
      5. Return to the pan, (add vanilla extract if using) and over a low heat gently stir with a wooden spatula until thickened (it coats the back of the spoon without dripping straight off).
      6. Pour the custard into a jug and serve at once.
      7. To keep hot, stand the jug in a pan of hot water and cover the top with cling film to prevent skin forming.

        The main thing that goes wrong with custard making is the egg scrambling when the hot milk/cream is added. I managed to avert this by not having the mix get too hot at any point. 
        It does take time and patience to make your own custard but the sense of pride and satisfaction you get when serving it with a home made cake or pie makes it completely worth it. 

        Feel free to play with the flavours when you've mastered the technique, I made a second batch using all milk (semi skimmed) no cream to make it a bit healthier. Or you could go the other way and make it with all cream no milk. 


    Tuesday, 8 October 2013

    Knorr - A tasty short cut. Review.

    Recently I was asked if I'd like to try some Knorr stockpots and gravy pots for review. I've been meaning to try them since they were launched but always gone for the cheaper supermarket own brand instead.

    I honestly didn't think there would be much if any difference between supermarket own and Knorr so I was pleasantly surprised when it came to reviewing them.

    I tend to use stockpots for loads of things, not just the usual such as for gravy or sauce but for going into my risotto's or cous cous (so much nicer than using plain boiling water).

    I tried out the chicken stock pot in a Saffron risotto simply by making up a pint of chicken stock using the Knorr stockpot and adding a small pinch of Saffron to the stock, letting the flavours infuse together before adding to the Arborio rice.


    A beautiful flavour combination! The chicken stock smells and tastes just like roast chicken, without the fuss of boiling the bones and reducing down the liquid. Bliss!

    I then turned my attention to the vegetable stock cubes. I had roasted a large gammon joint which was being used to make many different meals. One of which was a 'diet friendly' Carbonara. I fried some sliced mushrooms in some Frylight (low cal cooking spray) and chucked in some of the sliced chopped gammon. Next I added 300ml of vegetable stock and simmered until the liquid had reduced by half.
    The reason I added stock to my Carbonara was due to me using soft cheese spread in place of cream as is traditional which I find needs a little liquid to stop it becoming dry.
    Next I added two egg yolks mixed with 200g extra light soft cheese and added some (cooked) pasta and garden peas.
    Heat it all through until the egg is set and enjoy!


    Also using the gammon roast, I made littlest baker a traditional roast gammon dinner and made up a gravy pot as a quick, tasty alternative to gravy granules (which I really prefer not to use if I can help it.) A roast dinner with the trimmings made quickly using micro steam veg pouches, my Airfryer for some of the best home roast potatoes I've had in years! and a Knorr gravy pot for the gravy. So simple yet so good! 


    Monday, 30 September 2013

    Sweetpea pantry - making baking easy, delicious and fun. Review

    It's been a few weeks now since I visited the Cake and Bake show London with the littlest baker and my mother in law. We went on a Saturday which was a sell out and wow was it busy! We could hardly move for people though I did manage to squeeze up to a few stalls to get a better look at the wares and pick up some samples and ideas. There were some really delicious looking and tasting products for sale as well as baking celebs meandering around happily signing autographs and posing for pics. All in all a great day, I will definitely be back for 2014!


    One of the things I picked up to try whilst I was there was Sweetpea Pantry's Grainy Brainy Pancakes mix.
    Sweetpea Pantry is all about making baking with kids easy, delicious, fun and wholesome. They provide all the necessary dry ingredients in a mix with instructions on how to help your little one create their very own baked goods.


    Littlest baker absolutely LOVES breakfast, it is by far her favourite meal of the day. So what better time to try the Grainy brainy pancakes than for a yummy Saturday morning breakfast? 

    It couldn't have been more simple, all that I needed to add to the ingredients was 1 egg and 1 cup of milk.
    After that it was pretty much all up to the Littlest Baker, until it came to the cooking part.
    The pancake batter was mixed together in no time, meaning that for a little one with a short attention span the work was done and the pancakes ready in all of about 10 minutes.


    One pack of the mix (there's 2 in the box) made around 8 decent sized pancakes which fed the three of us well.
    Littlest Baker had hers with some maple syrup and cinnamon sprinkled over them, I had maple syrup and banana just to make it a touch more filling. Though as the mix has no sugar added it is perfectly possible to make the pancakes savoury by adding cheese and ham perhaps for a lunch box treat or brunch.

    Ready to tuck in!
    What helps to make these mixes from Sweetpea Pantry so special is that they have no added sugar or salt, they are gluten free, contain wholegrains and have nothing artificial. So that also means no guilt from me for giving Littlest Baker pancakes for breakfast. 

    I'm off now to look at the Sweetpea Pantry website to see what we can try next.


    Saturday, 24 August 2013

    Asda's new Chosen by Kids range - Review

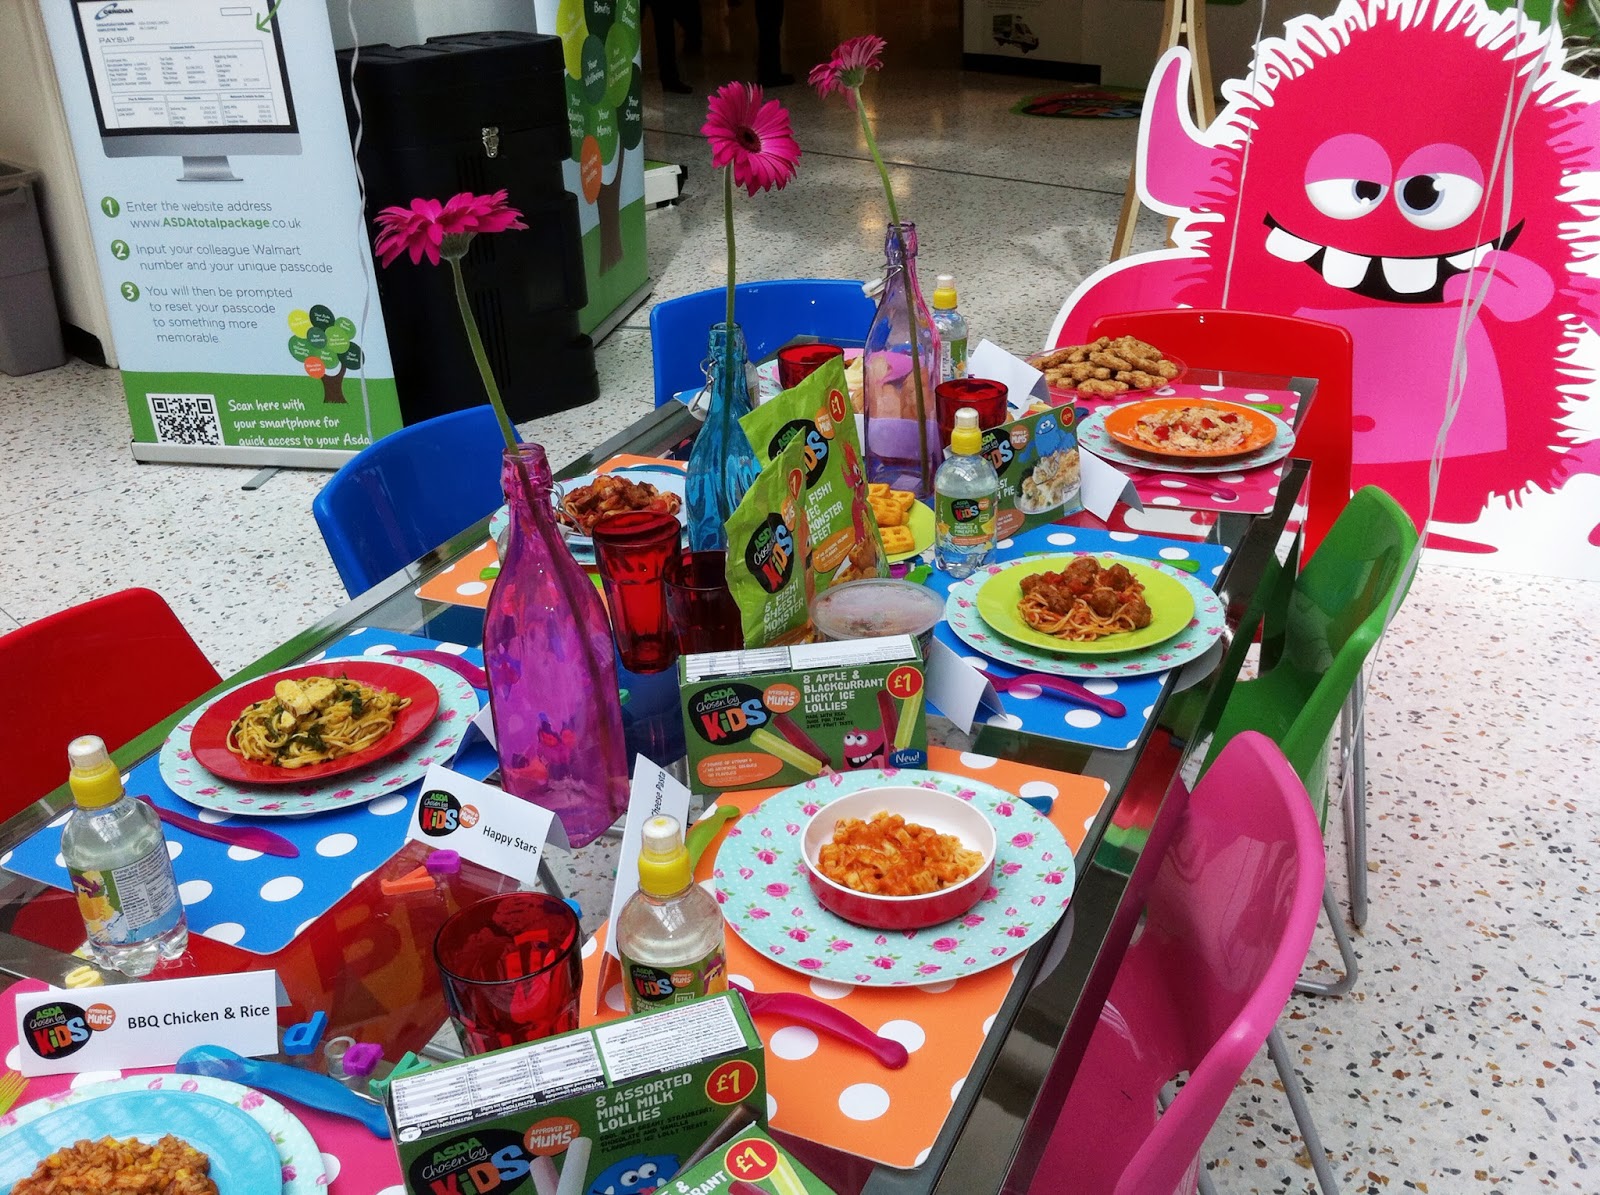
    Asda are bringing out some innovative new products and re launching some of their older products under their new Chosen By Kids range.

    The range will feature a huge 180 products spanning across all meals of the day. The entire Chosen by Kids range has been tasted by kids and approved by mums.


    To mark the launch of their Chosen by kids range Asda held a special event for bloggers and their little ones to give us an exclusive insight into how the tasting process works and have a sneak preview of some of the food in the range.

    Myself and Littlest baker were invited up to Asda's home office (Asda house) in Leeds to be a part of this special event. Leeds is a fair trek from Bedford so our hopes were high of having a good time at Asda house.

    Upon arrival we were immediately immersed into the Chosen by kids range as Asda house had a 'monster makeover' in their hub. Complete with the Chosen by kids cheeky monster characters milling around having photo ops and laughs with the mums and little ones.

    Littlest baker meeting Trixta

    We were walked through the area to explore the breakfast, lunch, dinner and snacking ranges and briefed about the range in general by Product development director Gail Paddy. 
    Breakfast

    Lunchtime

    Dinner

    After being shown the meal range by Gail we were taken away into a separate room and given an opportunity to try out some of the new products and even rate them using special 'yum' or 'yuk' paddles.
    Among the items we tried were Cheesy pasta shapes, which had a definite 'yum' paddle held up by Littlest baker, a squeezy yogurt pouch, another 'yum' paddle and Monster feet which Littlest baker was a bit undecided about. 

    Littlest baker was very happy with the squeezy yogurt.


    Every product has been tried and tested by kids, who enjoy the taste and then approved by mums. The mums approval comes from the point of view of nutrition, convenience and appeal.
    Many of the products contain hidden vegetables and fruit taking some of the guilt out of giving your kids a convenience food knowing they will still be getting their vitamins. With Monster Mash, which is a mix of mash potato, peas and broccoli, or the carrot and Potato waffles. 
    The Chosen by kids range has been designed to be a solution for mums juggling different family mealtimes with after school activities or working late, without breaking the bank as the prices start as low as 58p (Instant porridge pots). Incidentally the instant porridge pots needn't be a worry with the heat burning little hands as Asda have developed a thermal packaging that stays cool to protect them. 

    Snacks are also covered with options such as Mini Fruit Bags (five for £2) or Jelly with real fruit pieces, or Lime flavoured raisins ('yum' vote from Littlest baker). 

    Littlest baker was impressed with the range of products available and I'm sure with the kids going back to school really soon I will be featuring some of the products in her lunch boxes and after school when time is a premium due to after school activities.  I especially think she wants to try the Meatballs and Spaghetti that we saw on the Dinner table in the hub, it looked the perfect size for her appetite.

    All set for going back to school.


    How your weeks meals could be planned using Asda's new range.